Illuminated pushbutton switch LP
Illuminated Pushbutton Switches
-
Low Profile Ideal for low profile PC mounting or snap-in mounting with tight behind panel dimensions.
-
Full Face Illumination Bright LED provides excellent illumination
-
Two Mounting Methods PC board mount or snap-in panel mount.
-
Snap-Action Mechanism Snap-action mechanism provides tactile feel.
-
UL Recognized and CSA Certified Switches are UL recognized and CSA certified
Specification
| Rating | Gold plated contact: 0.4VA AC/DC Max. ・Voltage 20mV~48V ・Current 0.1mA~50mA 20mVAC/DC 0.1mA Min. |
|---|---|
| Initial contact resistance | Gold plated contaccts ; 100mΩ max. ( 1.5mA 200μVAC) |
| Dielectric strength | 1,500VAC 1 minute |
| Contact Bounce | 10 msec. max. |
| Electrical life | Gold plated contact: 50,000 operations( 50mA 48VAC/DC) 200,000 operations( 0.4VA AC/DC) |
| Operating force | 1 pole:1.47±0.98N 2 poles:2.26±0.98N |
| Travel | Total travel:2.3mm Lock travel alternate:1.5mm |
| Operating temperature range | -15~+60℃ |
| Storage temperature range | -25~+70℃ |
■Approvals UL File No.E43275 CSA File No.LR38341
Part Number Designation
■Nonilluminated
| LP- | 1 | S- | 2 | 6 | G- | W- | Z | |
|---|---|---|---|---|---|---|---|---|
|
Series code |
Box & Terminal style 1: Without Flange & PC Terminal |
Cap size S: 12×12 |
Poles 1: 1 pole |
Circuit Function 6: ON -(ON) |
Contact material G: Gold |
Cap color W:White R:Red K:Black G:Gray |
|
■Illuminated
| LP- | 1 | S- | 2 | 6 | G- | 2- | 2 | 9- | Z |
|---|---|---|---|---|---|---|---|---|---|
|
Series code |
Box & Terminal style 1: Without Flange & PC Terminal |
Cap size S: 12×12 |
Poles 1: 1 pole |
Circuit Function 6: ON -(ON) |
Contact material G: Gold |
LED color 2:Red 5:Green 8:Yellow |
Cap color 0:Clear 2:Red clear 5:Green clear 8:Yellow clear |
Filter 9:White clear 2:Red clear 5:Green clear |
■LED Specifi cation

| Symbol | Color | IF | VF | VR | |
|---|---|---|---|---|---|
| Nom. | Max. | ||||
| 2 | Red | 30mA | 2.0V | 2.8V | DC4V |
| 5 | Green | 25mA | 2.1V | 2.8V | DC4V |
| 8 | Yellow | 30mA | 2.2V | 2.8V | DC4V |
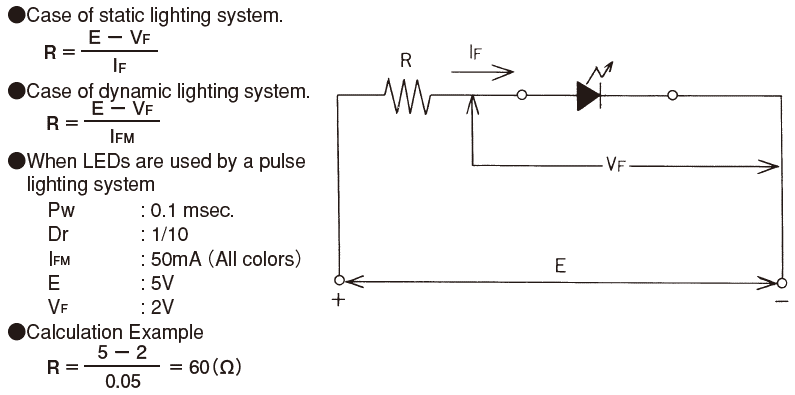
- Current to be applied to the LED must be lower than the forward current (IF) indicated in the LED Specifications of each switches. Resistance value R should be calculated using the following formula.
List of Part Numbers
◆Non-illuminated type
| Part No. | Poles | SW function | Cap color | Box / Terminals | Cap size | CAD |
|---|---|---|---|---|---|---|
| Part No.:LP1S-16G-W-Z☆ | 1 | ON-(ON) | White | Without Flange ・PC straight |
12×12 | |
| Part No.:LP1S-16G-R-Z☆ | 1 | ON-(ON) | Red | Without Flange ・PC straight |
12×12 | |
| Part No.:LP1S-16G-K-Z☆ | 1 | ON-(ON) | Black | Without Flange ・PC straight |
12×12 | |
| Part No.:LP1S-16G-G-Z☆ | 1 | ON-(ON) | Gray | Without Flange ・PC straight |
12×12 | |
| Part No.:LP1S-17G-K-Z☆ | 1 | ON-ON | Black | Without Flange ・PC straight |
12×12 | |
| Part No.:LP1S-26G-W-Z | 2 | ON-(ON) | White | Without Flange ・PC straight |
12×12 | |
| Part No.:LP2S-16G-W-Z | 1 | ON-(ON) | White | Without Flange ・PC straight |
12×12 | |
| Part No.:LP2S-16G-R-Z☆ | 1 | ON-(ON) | Red | Without Flange ・PC straight |
12×12 | |
| Part No.:LP2S-26G-W-Z☆ | 2 | ON-(ON) | White | Without Flange ・PC straight |
12×12 |
◆Illuminated type
| Part No. | Poles | SW function | Box / ・Terminals | Cap size | LED | Cap color | Filter | CAD |
|---|---|---|---|---|---|---|---|---|
| Part No.:LP1S-27G-229-Z☆ | 2 | ON-ON | Without Flange ・PC straight |
12×12 | Red | Red | ー | |
| Part No.:LP1S-27G-209-Z★ | 2 | ON-ON | Without Flange ・PC straight |
12×12 | Red | Clear | White clear | |
| Part No.:LP1S-16G-509-Z★ | 1 | ON-(ON) | Without Flange ・PC straight |
12×12 | Green | Clear | White clear | |
| Part No.:LP1S-16G-809-Z★ | 1 | ON-(ON) | Without Flange ・PC straight |
12×12 | Yellow | Clear | White clear | |
| Part No.:LP1S-16G-202-Z★ | 1 | ON-(ON) | Without Flange ・PC straight |
12×12 | Red | Clear | Red clear | |
| Part No.:LP1S-26G-505-Z★ | 2 | ON-(ON) | Without Flange ・PC straight |
12×12 | Green | Clear | Green clear | |
| Part No.:LP2S-26G-229-Z☆ | 2 | ON-(ON) | With Flange ・Solder |
12×12 | Red | Red | ー | |
| Part No.:LP2S-27G-509-Z★ | 2 | ON-ON | With Flange ・Solder |
12×12 | Green | Clear | White clear | |
| Part No.:LP2S-26G-202-Z★ | 2 | ON-(ON) | With Flange ・Solder |
12×12 | Red | Clear | Red clear | |
| Part No.:LP2S-16G-505-Z★ | 1 | ON-(ON) | With Flange ・Solder |
12×12 | Green | Clear | Green clear |
★: Made to order products
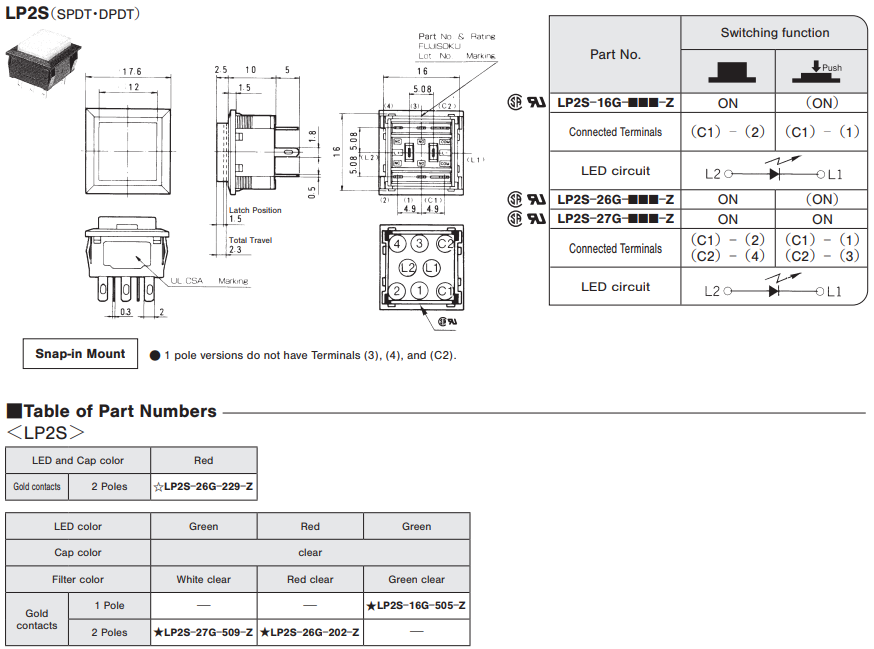
Outline Dimensions
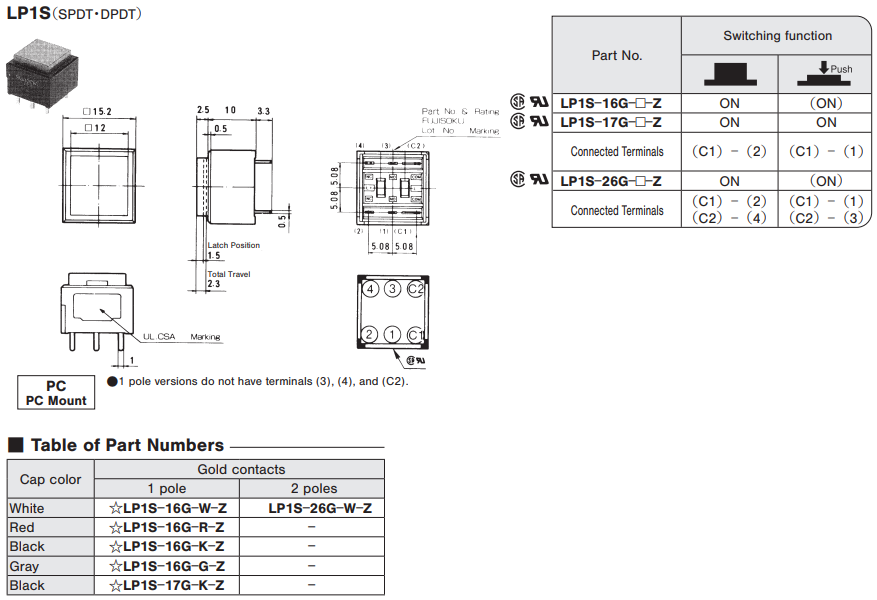
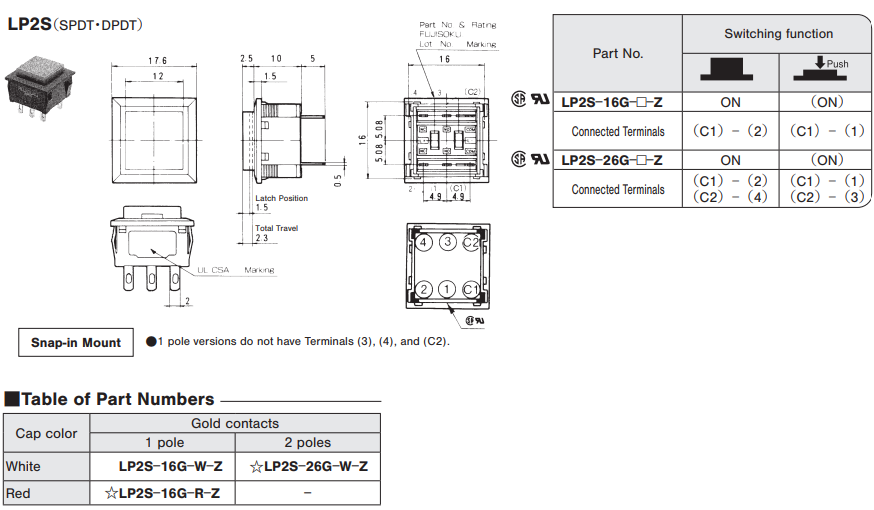
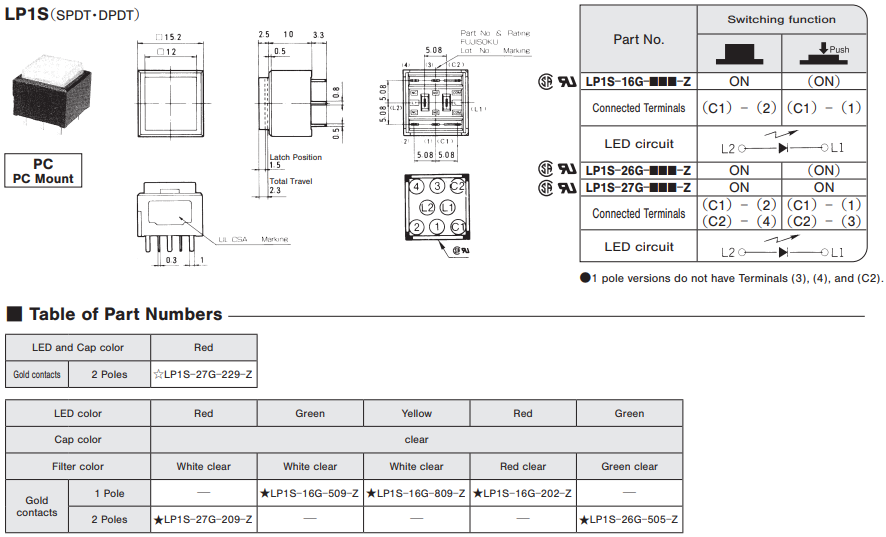
Precautions
◆Solderlng
⑴ Manual soldering
- Device:Solder iron ① 270℃ max. 5 sec. max.
⑵ Auto soldering
- Device:Jet wave or dip type
- 245 土10℃ 5 sec. max.
- Preheat time shall be 30 seconds max. at 100℃ max.
- For the alternate action switches, soldering should be done with the switch in the up position.
◆Flux Cleanlng
- Solvent : Fluorine or Alcohl type.
- The LP series are not washable. To wash the PC board, clean the soldering surface of the PC board with a brush so that the switch is not exposed to the cleaning solution.
- After soldering, wait until the temperature of the terminals cool down to 90℃ or below or until the parts are exposed to room temperature for more than 5 min. before washing.
◆Acuator(Cap)
- To activate the switch, press the cap as far as it goes. If the cap is not fully actuated, switching and/or locking may not occur. The pressing force of the cap should be 9.8 N or less.
- Use a soft cloth with alcohol to clean the cap surface. Do not allow the liquid to enter the switch body. Do not use thinner, acid, organic solvent, etc., since the caps and fi lter are made of a polycarbonate resin.
- Engraving or printing is possible on the cap and the fi lter. The engraving depth should be 0.3 mm maximum and the enamelbased paint should be within the coating thickness of 0.1 mm maximum.
- A film insert should be the size of the dimensions as shown in the fi gure on the left (t=0.1mm). The fi lm inserts are provided by the customer.
- The cap and the fi lter are two distinct parts. Removal of the cap should be done with the in the up position to avoid damages to the switch.
◆LED's
- The polarity of the LED is marked on the bottom of the switch. Connection should be made as marked.
- Protective resistors are not built into illuminated switches. Protective resistors must be integrated by the customer.
- LED specifications are shown on.
Mounting Procedures
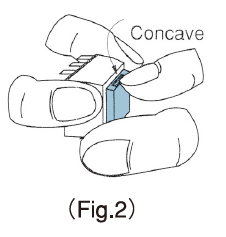
⑴ Removal of the cap
Use the notch on the side of the cap and pull up. Remove the cap with the switch in the up position.
⑵ Mounting the cap
A) Insert the fi lter into the cap. The fi lter is reversible.
B) Mate and snap in the two recesses on the inner side of the cap to the tabs on the side of the actuator of the switch.

⑶ Mounting the Switch Guard
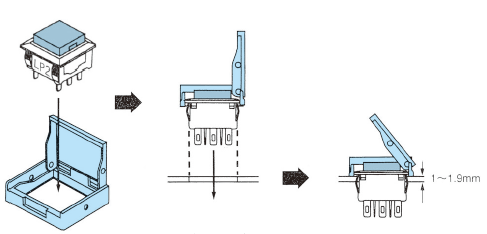
⑷ Panel cutout
- When cutting out the panel, press through the panel from the front side.
- Also make sure to mount the switch from the front side of the panel as shown in the fi gure below. This will help the mount spring on both sides of the switch latch on to the edge of the hole.
- Note that the vertical play of the switch when mounted is 0.3 mm max..

PC Hole Layouts(Top view)

Panel Cut-Out Dimensions

Packaging Specifications
(Unit:mm)

● If the order quantity is below the above packaging quantities, the packing style may be in trays.
Documents
Environmental Certificate
- ●The above contents and descriptions are subject to change without notice.


